 I love colour, so do my kids, but we’ve learned over time to appreciate the softer shades that natural colours give us. In our home when we DIY, we mostly avoid micas and artificial food colouring. This doesn’t mean that you can’t use brighter colours; depending on the recipe, it can be way more fun to have colours that pop, for sure. It’s up to you to decide which colourings meet your needs.
Despite our love of all things natural, and our appreciation for softer natural hues, in our house we adopt the 80/20 rule; basically, we try to do the absolute, very best we can 80% of the time, and we give ourselves 20% grace for those things we can’t control or that we choose to take shortcuts with.
This makes a natural life much more doable, fun and relaxing! I encourage everyone else to adopt a similar approach – this means that you can relax if you only have regular, artificial food colouring in your cupboard, and you want to colour your Lip Balm or Stretchy Spotty Sticky Goop hot pink! Be proud and focus on the fact that you’re doing such a great job of making natural goodies. Also, with my recipes, you won’t be eating the final products, so you might not be as worried about the colouring you use.
Let me help you navigate your way through the world of natural DIY and colouring, with some helpful guidance and suggestions.
What are the main types of colouring?
Natural powder – typically come from spices, fruits and vegetables. Here are some examples:
〉Yellow/orange – turmeric, paprika, pumpkin, ginger
〉Red – tomato, paprika
〉Green – green spirulina, kale, spinach
〉Pink/purple – beetroot, pitaya (dragon fruit), hibiscus
〉Black/brown – activated charcoal, cocoa, cinnamon, coffee
〉Blue – blue spirulina
Natural Liquid – sometimes you need to use quite a lot to get a good punch of colour. There are many brands on the market selling natural liquid colours.
Artificial (liquid and powder) – typically used in cooking and cake-decorating, usually very bright, and you may not need very much to get a big result.
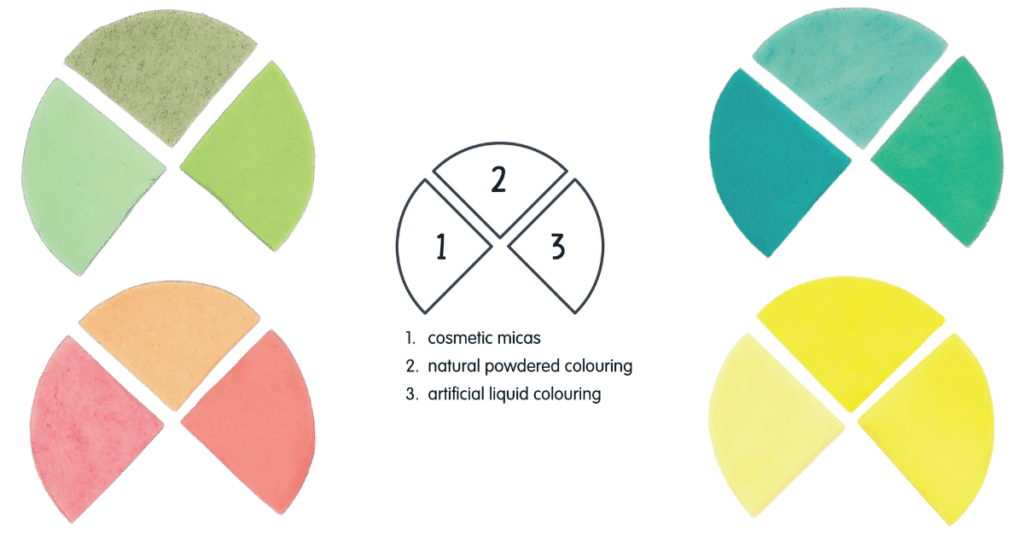
Cosmetic micas – minerals naturally formed from rocks and used to add shimmer and colour to recipes. Many are coated in bright, artificial colours. Always handle these with caution, never inhale them, and make sure you’re using cosmetic-grade micas that are designed to be used on the body.
Here is a useful colour comparison chart for you (I coloured some Fun Dough from my kids DIY recipe book, Make & Play):
Which colouring is best?
Depending on which recipe you’re making, you might need to use a powdered or liquid colouring. Sometimes, a specific colouring really is the better choice and, in these cases, I’ll point it out. Feel free to have a play around though; you are most welcome to experiment, in fact, I encourage it. Just keep in mind that some natural powdered colours and spices don’t mix perfectly well into oils and waxes, and in some recipes, liquids just aren’t a good choice.
If I haven’t suggested a quantity, that’s because it doesn’t matter and it is up to you how much colouring you use to get your desired outcome. It’s always advisable to add a little bit at a time – you can always add more, but it’s near impossible to take it away!
Can you make your own colouring?
Short answer: Yes.
Long answer: You can dehydrate (dry) and blitz, or boil down, many fruits and vegetables to get natural colourings. Although these types of colourings can work in natural DIY, from my experience, the liquids just don’t last very long, the powders are often too lumpy and gritty, and I think they are best left for colouring icing, cakes and other food-based recipes.
So there you have it. Lots of guidance on colouring your natural DIY goodies. Click this link for lots of suggestions on suppliers of natural ingredients.
Happy colouring!
