I just love beeswax covers. What a great alternative to disposable, land-filling, single-use cling film! I bought one set which lasted me over 12 months (so you really do get value for money) however, I wouldn’t be The Inspired Little Pot if I didn’t try to ‘DIY’ and write up a recipe now, would I?
I have seen recipes for beeswax covers/wraps that require pine resin and jojoba oil. If you feel like giving these go, go for it. But they do get a little fiddly and while my version isn’t quite as sticky, it still works well.
They makes the perfect ‘green’ kitchen companion and also make a gorgeous gift to give! So, here it is in all its simple, cost-effective and empowering glory.
Note: Make sure you read the ENTIRE recipe before starting, as well as the notes. I have done the hard yards (you should see how much beeswax I had to get off my ironing board, iron and floor!!) so if you prepare yourself properly, you should have 100% success the first time!
Reusable Beeswax Covers
Makes: enough for 1 wrap Prep time: < 10 min.
Ingredients
A tight-weave fabric of choice
2 tbsp beeswax (approx.)
Method
1. Measure fabric and cut using pinking shears – this minimises fraying of edges.
2. Lay down a large sheet of baking paper and place fabric on top. Add beeswax to the centre of the fabric.
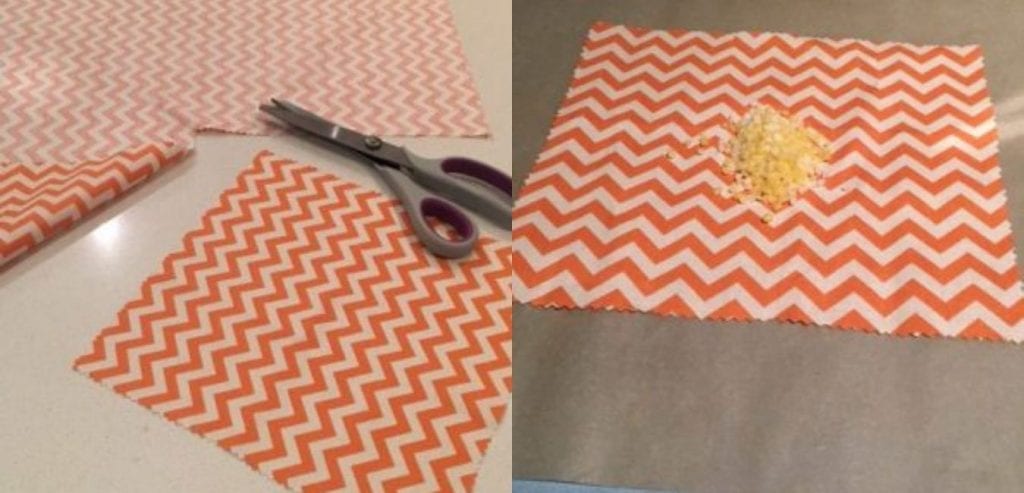
3. Place
4. Continue until all of the fabric has been saturated with beeswax.
5. If required, lift
6. Before removing the baking paper, it is important to make sure the entire piece of fabric is evenly coated with beeswax and still hot. Quickly lift the top piece of baking paper off, then grab two corners of fabric and remove from the bottom sheet of baking paper.
7. Hold up the coated fabric for 5-10 seconds, or until dry.

To Use
Wrap gifts and secure with ribbon or twine. For food use, warm wrap between hands and mould over bowls of leftover food, sandwiches or cut fruit. Avoid using
Recipe Notes
Make sure your baking paper is larger than your fabric square. The amount of beeswax in this recipe should cover fabric approximately 30 x 30 cm | 12″ x 12″ in size.
These covers are not watertight or airtight. They are perfect for covering leftovers or pieces of cut fruit and veg.
DO NOT cover raw meat.
Properly cared for, these wraps will last 6-12 months. When the beeswax looks like it is starting to flake, it is time to make some more, or for an even more sustainable option, repeat the process above and bring them back to life!

Krissy Ballinger
Author, Advocate & Founder
Krissy wants to see a world where people make conscious, educated decisions that honour both humans and habitat. With a background in education and health promotion, she devotes her time to passionately increase awareness on common and avoidable toxins, in everyday items like washing powder and deodorant, and to educate individuals on how they can easily reduce their daily exposure, through simple and realistic do-it-yourself ideas and recipes.
Krissy has sold over 40,000 copies of her natural DIY recipe books, including her award-winning book, Naturally Inspired - Simple DIY Recipes for Body Care and Cleaning, and her newly-released kids book, Make & Play - Natural DIY Recipes for Kids. She offers honest and gentle guidance, education and 100+ natural DIY recipes on her website.
Krissy have you ever used your thermo to blitz some chunks of beeswax into more manageable pellet sized bits? I’ve been gifted a 500g block
I wouldn’t recommend it! It’s very difficult to clean. Best idea, if you can’t access pellets, is to dedicate a hand grater to beeswax. Good luck 🙂
Hey krissy! You mentioned to me at the event in Esperance where to get ethical beeswax from. Can you remind me please?
Hi Carly, I sure can – Northern Light Beeswax. I share all of my ingredient suggestions here > https://krissyballinger.com.au/blog/my-favourite-suppliers-of-natural-ingredients-packaging-accessories/